Apple Mail App Setup Instructions
Here is how you set up mail using the Apple Mail App which you will find on MacBook, MacBook Air,
MacBook Pro, iMac, Mac Pro, and Mac Mini (MacOS devices).
Open your Mail (postage stamp at bottom of screen).

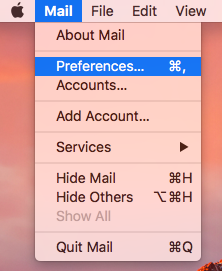
On top left of screen, click on Mail and choose Preferences.
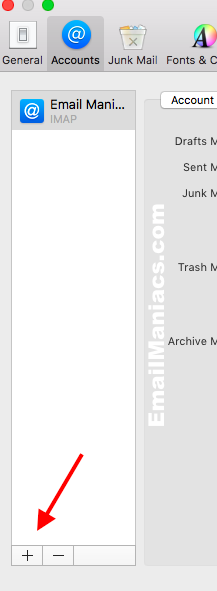
In the box that comes up, click on Accounts. At the bottom left of the box click on +
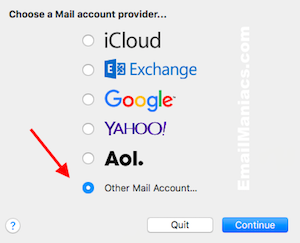
Choose "Other Mail Account..." and press Continue
Type in your Name, Email Address, and Password.
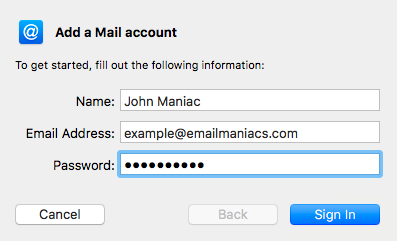
Press Sign In.
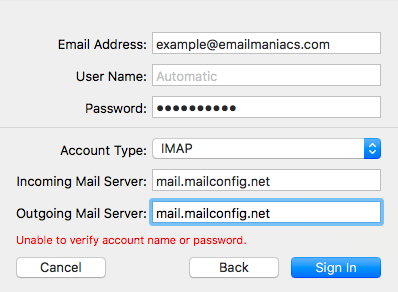
Enter your email address in the User Name box.
Account Type should be IMAP.
Type in mail.mailconfig.net in the Incoming Mail Server Box.
Type in mail.mailconfig.net in the Outgoing Mail Server Box.
Press Sign in
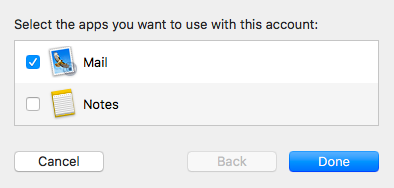
Press Done
Congratulations. You're all done!
Open your Mail (postage stamp at bottom of screen).

On top left of screen, click on Mail and choose Preferences.

In the box that comes up, click on Accounts. At the bottom left of the box click on +

Choose "Other Mail Account..." and press Continue

Type in your Name, Email Address, and Password.

Press Sign In.
Enter your email address in the User Name box.
Account Type should be IMAP.
Type in mail.mailconfig.net in the Incoming Mail Server Box.
Type in mail.mailconfig.net in the Outgoing Mail Server Box.
Press Sign in

Press Done

Congratulations. You're all done!
Quick Settings:
IMAP - Incoming Mail
Server: mail.mailconfig.net
SSL enabled
Port: 993
SMTP - Outgoing Mail
Server: mail.mailconfig.net
SSL enabled
Port: 465
Authentication for both IMAP and SMTP. Your username is the same as your email address.
More Information:
Instructions
Go here if you need detailed Email Setup Instructions for a different device.
